Mobile App Customizations
The Rewards SDK enables agnostic platform embedding, offering a quick way to integrate with any frontend. However for a mobile app integration the SDK will require the use of a webview.
There are a couple additional configurations that we recommend you setup along with the webview; a) event handling to enable bi-directional communication between the webview and the host application, as this will enable a more secure handling of user tokens when a user decides to opt-in; and b) update your mobile app deeplinks to support opening the webview to an appropriate URL.
Setup Webview
Summary Of Tasks
| Action | Platform | Examples |
|---|---|---|
| Enable webview location permissions [nearby page] | Android | Android manifest: <uses-permission android:name="android.permission.ACCESS_COARSE_LOCATION"/> or ACCESS_FINE_LOCATION |
| Enable JavaScript execution and/or setDomStorage in webview | iOS / Android | Kotlin ObjectiveC Java Swift |
| Match layout to the parent for systems using Jetpack Compose | Android (jetpack compose) | Kotlin |
| Intercept back button / gesture | Android / IOS (optional) | It is advisable to intercept physical buttons or gestures for backward navigation. If the user performs such an action, we recommend sending the "go back" action to the webview. Examples can be found here: Kotlin Java |
| Layout - The webview should have a header chrome consistent with the color of your mobile app, we recommend putting the program name in the middle and a close button on the top right. It should also have 20-30px safe area along the bottom to accomodate iOS and Android's navigation bar at the bottom of the screen. | Android / iOS |  |
Event Handler
FlipGive Rewards communicates bidirectionally with the webview by extending functionality through message passing between JavaScript and the native language used in the host app. This is needed in order for shop links to open the mobile app's native browser to start a shopping trip. (We don't want people to shop within the webview)
The following are the events sent by the page and their usage.
| Event Code | Usage | Action | Detail |
|---|---|---|---|
| USER_DATA_REQUIRED | Event used to request a new token to complete the opt-in flow. Default timeout 1 minute | inject javascript: (function() { window?.updateToken?.("newToken") })() | "USER_DATA_REQUIRED" refers to a concept where specific user data or attributes are necessary for the proper functioning of certain features or processes within the FlipGive Rewards integration. In the context of the Rewards integration, it's implied that certain user data needs to be available to generate the required token or to facilitate specific interactions with the embedded storefront. |
| OPEN_IN_BROWSER | Event used to open a URL in a new web browser. The separator used is '::'. Example: OPEN_IN_BROWSER::newURL. | "OPEN_IN_BROWSER" refers to a mechanism where a specific URL or link is intended to be opened in an external web browser, rather than within the context of the mobile app itself. This approach is commonly used for web-based content that is not directly integrated into the app's user interface. |
Code Samples
We recommend following the implementations for a better understanding:
- Swift: https://github.com/BetterTheWorld/demo-cloud-app-swift/tree/main
- Objective C: https://github.com/BetterTheWorld/demo-cloud-app-objectiveC
- Kotlin: https://github.com/BetterTheWorld/demo-cloud-app-kotlin
- Java: https://github.com/BetterTheWorld/demo-cloud-app-java
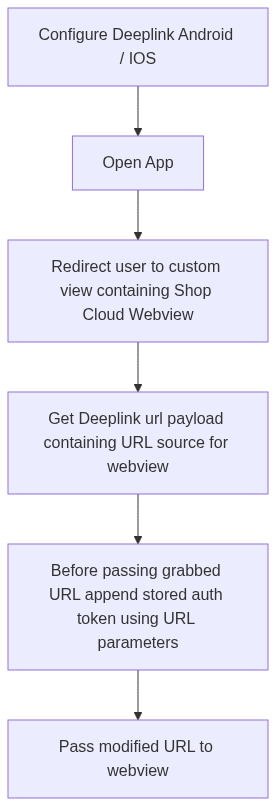
Deep Links
Deep links allow external email links to route the user directly into the webview and load the appropriate page content. There are 3 different methods available to handle deep links:
| Solution | Platform | Compatibility |
|---|---|---|
| Universal links | IOS | IOS 9.2 and higher |
| App Links | Android | Android 6.0 (API level 23) and higher |
| URI Scheme & Intent Filter | Android | Android 1.0 and higher |
Note: The implementation model is chosen by the app host.
Overview
Link Format
URI://PATH?PARAMETER=URL
Example:
URI: myAwesomeApp
PATH: cloudShop
PARAMETER: webLink
URL: https://cloud.almostflip.com/demo?brandId=2
Note: URL is our demo example, please, refer to your custom cloud URL in this document to get the correct one.
| Method | Link |
|---|---|
| URL/URI schema | myAwesomeApp://cloudShop?webLink=https://cloud.almostflip.com/demo?brandId=2 |
| Universal Links / App links | https://myAwesomeApp.com/cloudShop?webLink=https://cloud.almostflip.com/demo?brandId=3 |
iOS
Suggested apple integration here
- Create an App ID and enable Associated Domains: Make an ID for your app and enable Associated Domains for it to use Universal Links.
- Set up a web server: Set up a web server and host a file called the Apple App Site Association (AASA) file. This file will have information about your app's Universal Links and Deep Links.
- Configure the AASA file: Configure the AASA file with JSON data, including app's bundle identifier, the domains it can handle, and which parts of the app to open with the links. Here is an example extracted from Shop Cloud server.
- Handle incoming links in your app: Write code that can recognize and handle incoming links. This will involve checking whether the URL matches any of the app's registered Universal Links or Deep Links and opening the appropriate screen within the app.
Android
Suggested android integration here
- Define Intent Filters: Intent filters define how the host app responds to incoming deep links. In the AndroidManifest.xml file, define intent filters for each activity that can handle deep links. Example:
<activity android:name=”MainActivity”>
    <intent-filter android:autoVerify="true">
      <action android:name="android.intent.action.VIEW" />
      <category android:name="android.intent.category.DEFAULT" />
      <category android:name="android.intent.category.BROWSABLE" />
      <data android:scheme="http" />
      <data android:scheme="https" />
      <data android:host="www.example.com" />
    </intent-filter>
  </activity>
- Verify Digital Asset Links: To ensure that the host app is authorized to handle links for a given domain, create a Digital Asset Links file on your web server. This file verifies that the app and the website are owned by the same entity.
- Associate App Links with a Web Domain: Associate the app's package name with a specific web domain in the Android Studio. This allows the app to respond to links that are related to that domain.
- Test and Debug.
Once the app opens the link and directs the user to the desired view of the webview , it is necessary to add the token to pass the base url of the webview as follows:
| Method | Link |
|---|---|
| URL/URI schema | myAwesomeApp://cloudShop?webLink=https://cloud.almostflip.com/demo?brandId=2&token=my_user_token |
| Universal Links / App links | https://myAwesomeApp.com/cloudShop?webLink=https://cloud.almostflip.com/demo?token=my_user_token |
Branch
If you are using a branch, we recommend creating a link based on the previous logic, for example:
https://myawesome.app.link/flipgiveIntent?weblink="xyz"
URI://PATH?PARAMETER=URL
URI: myAwesomeApp.app.link (provided by Branch)
PATH: flipgiveIntent (can be anything, based on your logic)
PARAMETER: webLink (can be anything, based on your logic)
URL: https://cloud.almostflip.com/demo?brandId=2 (Dynamic parameter, coming from an external actor such as emails.)
We recommend following the integration guide provided by Branch here.
Layout
Cutout areas
Areas like notches and the floating home button can interfere with the content displayed in a webview. You can mitigate these areas by wrapping your view, depending on the language.
We recommend using the SafeArea for iOS Apple Developer Documentation and the Layout API for Android Android Developers to ensure optimal content positioning and layout across different devices.
Here is an example of how we improve the user experience in React Native:
export default function App() {
  return (
    <SafeAreaView style={{ flex: 1 }}>
    <WebView
      style={styles.container}
      source={{ uri: cloudUri }}
    />
    </SafeAreaView>
  );
}
Smooth Scrolling
iOS
On iOS, the acceleration rate of scrolling in WebViews can be customized by adjusting the scrollView's decelerationRate property. The UIScrollViewDecelerationRateNormal and UIScrollViewDecelerationRateFast are the two predefined values provided by UIKit, but you can also specify a custom value.
Here's an example:
import UIKit
import WebKit

class ViewController: UIViewController {
    var webView: WKWebView!

    override func viewDidLoad() {
        super.viewDidLoad()
        webView = WKWebView(frame: self.view.bounds)
        self.view.addSubview(webView)
        let url = URL(string: "https://example.com")!
        webView.load(URLRequest(url: url))

        // Adjust the acceleration rate of scrolling
        webView.scrollView.decelerationRate = UIScrollView.DecelerationRate.fast
    }
}
Android
For Android, the acceleration rate is generally handled by the WebView's scrolling mechanics and the device's hardware capabilities. There isn't a direct equivalent to iOS's decelerationRate for WebViews. However, you can manipulate the overall smoothness and performance of the WebView through various settings and optimizations, like enabling hardware acceleration in your application's manifest or using setLayerType on the WebView.
<application android:hardwareAccelerated="true" ...>
webView.setLayerType(View.LAYER_TYPE_HARDWARE, null);